This guide provides a comprehensive roadmap for deploying DeepSeek in enterprise environments, from server estimation to advanced customization & Dify AI applications building. The first step in deploying DeepSeek for enterprise use is to evaluate the specific requirements for the model based on the actual business scenario. This includes determining the type of model needed and estimating the server resources required to support it, i.e., server configuration estimation. Once the server configuration is estimated, the next step is to assess the deployment method. If simple model fine-tuning meets our business needs, deploying with Ollama will suffice. However, if the model needs to be customized or developed further, then using LMDeploy for native deployment is necessary.
How to Reasonably Estimate the Server Configuration Required
The server configuration should be estimated based on factors such as the model’s parameters, sequence length, batch size, and quantization type. Please contact our IT hardware experts, and we can recommend the right configuration for you and provide hardware quotes. You can also using the following configuration calculator tool to help prepare a server configuration list: Server Configuration Calculator
How to Use Ollama to Deploy the Specified Version of DeepSeek
Installing Ollama
Ollama is a tool for running large models locally, and it supports downloading and running models on macOS, Linux, and Windows.
Here’s how to install Ollama:
- For macOS and Windows users, simply visit the Ollama website at ollama.com/download and download the appropriate installation package.
- For Linux installation:
curl -fsSL https://ollama.com/install.sh | sudo bash
sudo usermod -aG ollama $USER  # Add user permissions
sudo systemctl start ollama    # Start the service
Once Ollama is installed, you can check the version by running:
ollama -vIf the version information appears, the installation is successful.
Using Ollama to Deploy DeepSeek
Visit the Ollama website at DeepSeek on Ollama, select the model parameters you need, copy the corresponding command, and execute it in the terminal to complete the installation.
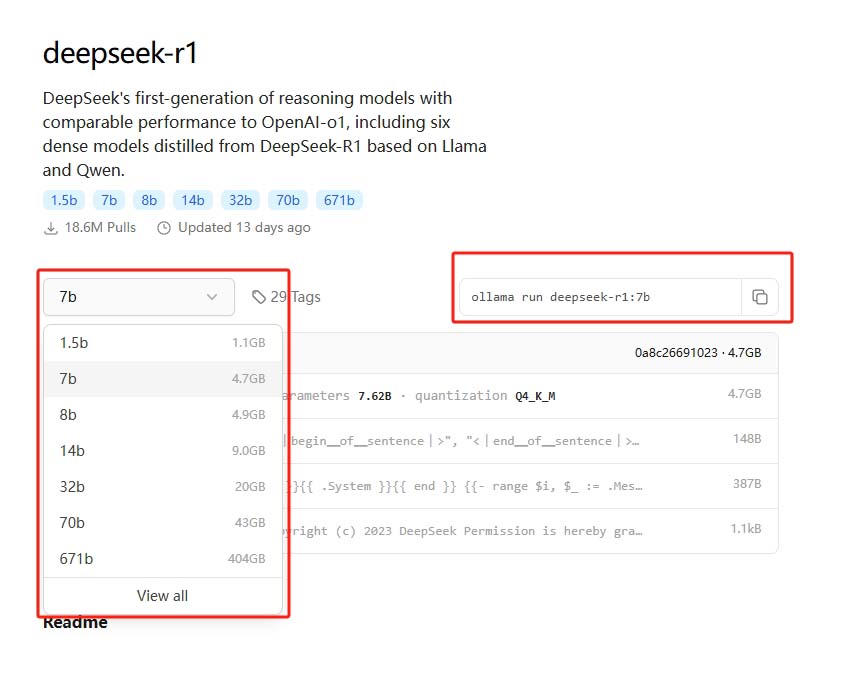
Run the command ollama run deepseek-r1:7b to install the DeepSeek R1 model.

How to Use LMDeploy for Native Deployment & Customization of DeepSeek
Installing LMDeploy
According to DeepSeek team, DeepSeek-R1 can be deployed using frameworks like SGLang, LMDeploy, TensorRT-LLM, and vLLM. This guide uses LMDeploy for native deployment. LMDeploy is a Python library for compressing, deploying, and serving large language models (LLMs) and vision-language models (VLMs). Its core inference engines include TurboMind, developed with C++ and CUDA for optimized performance, and PyTorch, which is pure Python and lowers the development barrier.
It is recommended to install LMDeploy in a clean Conda environment (Python 3.8-3.12) using the following commands:
conda create -n lmdeploy python=3.8 -y
conda activate lmdeploy
pip install lmdeploy
For detailed installation instructions, refer to the official LMDeploy documentation.
Deploying the DeepSeek Model
Run the following Python code to deploy the DeepSeek model (using the deepseek-ai/DeepSeek-R1-Distill-Qwen-7B model as an example):
from lmdeploy import pipeline, TurbomindEngineConfig
# Model path can be one of the following:
# 1. Local directory path pointing to a Turbomind model
# 2. model_id for an lmdeploy-quantized model
# 3. model_id for a model in a model repository
model = 'deepseek-ai/DeepSeek-R1-Distill-Qwen-7B'
# TurboMind engine configuration for backend parameters
backend_config = TurbomindEngineConfig(
    cache_max_entry_count=0.2,  # Max cache entries
    max_context_token_num=20544,  # Max context token count
    session_len=20544  # Session length
)
# Generation configuration for text generation parameters
gen_config = GenerationConfig(
    top_p=0.95,  # Sampling threshold
    temperature=0.6,  # Temperature for diversity
    max_new_tokens=8192,  # Max new tokens
    stop_token_ids=[151329, 151336, 151338],  # Stop token IDs
    do_sample=True  # Enable sampling
)
# DeepSeek AI service class
class DeepSeekAiServicer:
    def __init__(self, model: str, backend_config: TurbomindEngineConfig, gen_config: GenerationConfig):
        self.llm = pipeline(model, backend_config=backend_config)
        self.gen_config = gen_config

    def chat(self, content):
        prompts = [{
            "role": "user",
            "content": "What is the meaning of life?<think>\n"
        }]
        response = self.llm(prompts, gen_config=self.gen_config)
        return response
By using LMDeploy to deploy the model, we gain more flexibility for adjustments. We can optimize aspects such as memory management, concurrency, and load balancing. Additionally, LMDeploy allows us to integrate other Python libraries for fine-tuning the model and adding custom layers, enhancing our ability to customize and deploy the model efficiently.
Build AI applications using Dify
Whether you’re using LMDeploy or Ollama to deploy DeepSeek, we recommend using Dify to create AI applications next.
Why Use Dify?
Dify is an open-source platform for developing applications with large language models (LLMs). It integrates Backend-as-Service (BaaS) and LLMOps, enabling developers to quickly build production-level generative AI applications. Non-technical users can also participate in defining and operating AI applications.
Dify includes essential technologies for building LLM applications, such as support for hundreds of models, an intuitive prompt orchestration interface, a high-quality RAG engine, a robust Agent framework, and flexible workflow orchestration. With Dify’s easy-to-use interface and APIs, developers can avoid reinventing the wheel and focus on innovation and business needs.
In simple terms, if you want to build a RAG knowledge engine or workflow using a model, you would typically need to write a lot of LangChain code. However, Dify simplifies this by encapsulating the process in a visual interface, allowing you to build your AI applications quickly.
Running Dify
To run Dify, you need Docker and Git installed locally. Then, execute the following commands to run Dify:
git clone https://github.com/langgenius/dify.git
cd dify/docker
cp .env.example .env
docker compose up -d # If the version is Docker Compose V1, use the following command: docker-compose up -d
After running the command, you should see the status of all containers and their port mappings. For detailed instructions, refer to the Docker Compose deployment.
Integrate DeepSeek into Dify
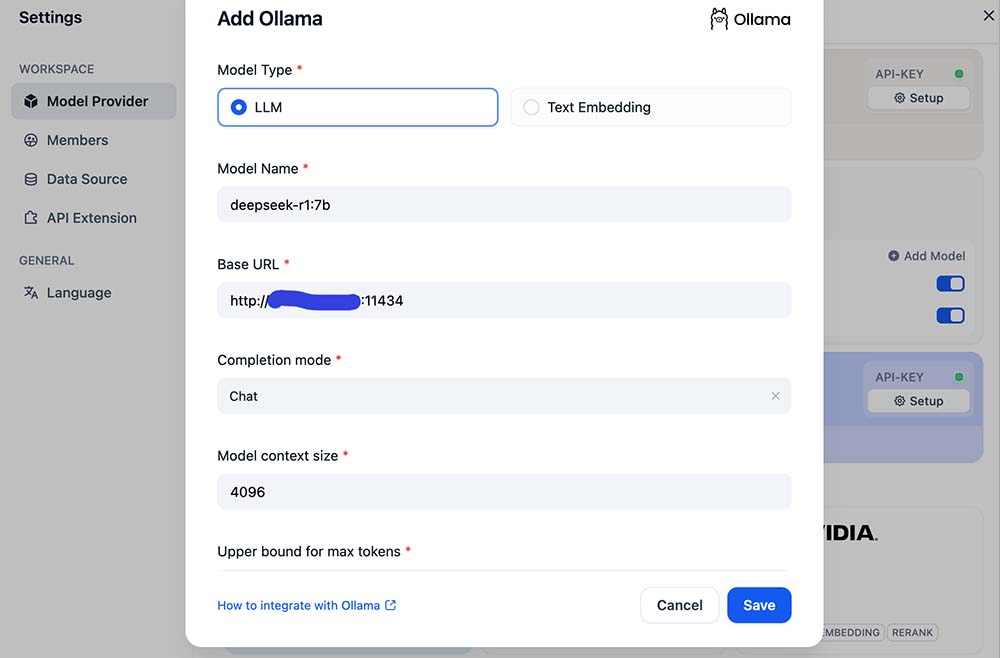
After Dify is running, access it via the browser at http://your_server_ip , click the profile icon in the top-right corner of the Dify platform → Settings → Model Provider, select Ollama, and click ‘Add Model
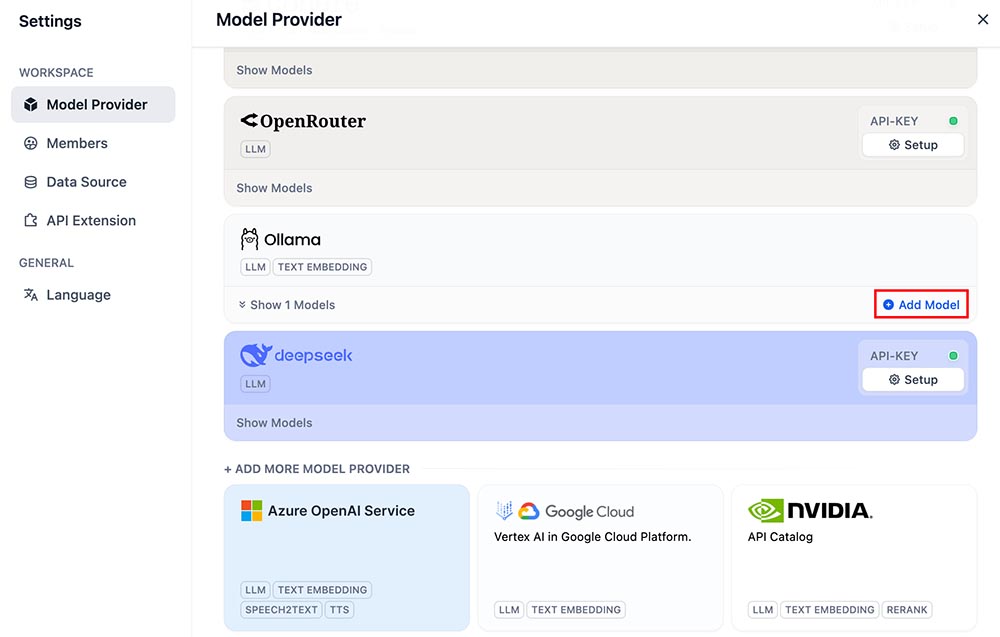
- Add the LLM model: Choose the model type LLM, set the model name (e.g.,
deepseek-r1:7b), and the base URL ashttp://host.docker.internal:11434 - Add the Text Embedding model: Choose Text Embedding, set the model name to
nomic-embed-text:latest, and the base URL tohttp://host.docker.internal:11434
After both models are added, you can see the model details in the Model Supplier list.
Create a Knowledge Base
Create a new knowledge base and upload your private data. Choose the nomic-embed-text model for the embedding model, then save it as a knowledge base.
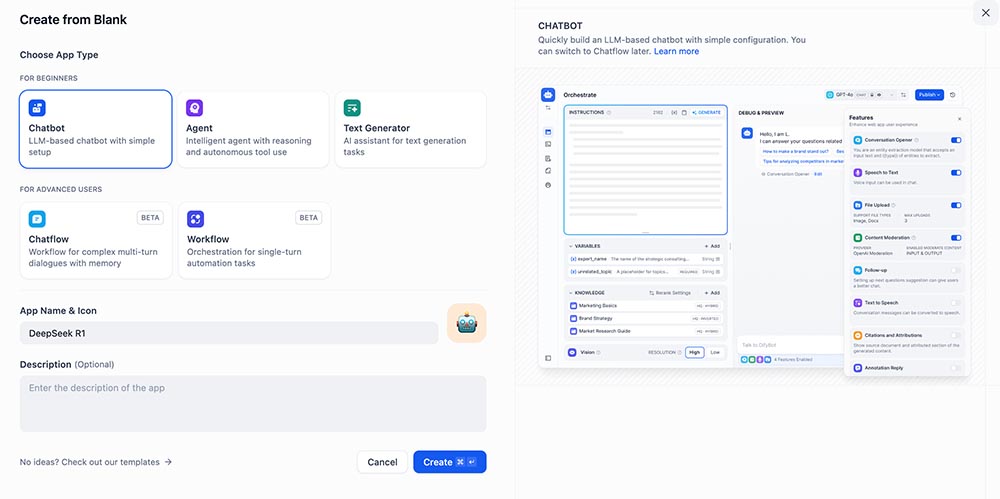
Creating a Chatbot
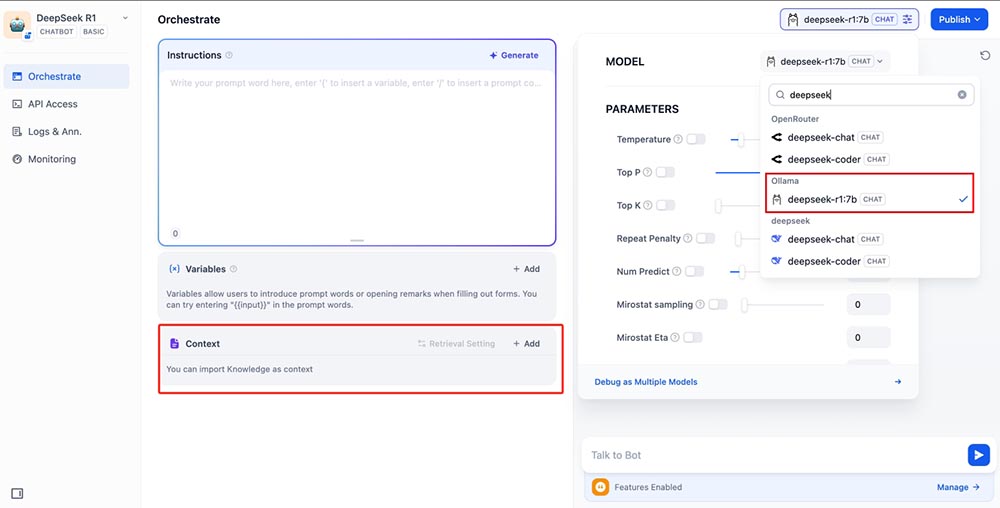
When creating a new chatbot, import the knowledge created earlier as context, in the top-right corner, select the deepseek-r1:7b model within the Ollama framework. If the chatbot is asked about specific content related to this knowledge base, it will respond with information unique to that knowledge base. Now you can publish the chatbot so others can use it to access the knowledge base.
Dify Workflow
One of Dify’s standout features is the Workflow module. By constructing workflows, you can transform a model that only has reasoning capabilities into one that can take actions. Dify allows you to automate complex tasks such as data analysis, report generation, resource scheduling, and even cross-platform operations. These tasks become part of a cohesive workflow that enhances efficiency.
Conclusion
Deploying DeepSeek in enterprise environments offers a powerful and flexible solution for businesses looking to harness the full potential of AI. Whether you choose Ollama for simple fine-tuning or LMDeploy for advanced customization, this guide equips you with all the essential steps to ensure a smooth implementation. By leveraging Dify, you can take your AI applications to the next level, building knowledge bases, chatbots, and automated workflows with ease. With the right tools and infrastructure in place, you can seamlessly integrate DeepSeek into your operations, creating AI-driven solutions that drive efficiency, innovation, and business growth.


